Showing posts with label kids. Show all posts

Thursday, July 21, 2011

Summer Safety


It's summer and schools out. It's the time for kids to run and play in parks, on beaches and through backyards! But with all this heat, sun, and water, parents need to stay vigilant. Here are summers main concerns and ways to beat the heat, keep kids safe, and still have fun!


HEAT:
When the thermometer keeps rising there are many things parents need to be mindful of. Heat Exhaustion, Heat Stroke and Dehydration are the three big ones. It's hard for adults to make sure that they are getting enough  fluids, or to know how much their bodies are working, so kids need to have adults looking out for them.
  • Avoid sun exposure between 11am and 3pm. This is the time of day when the sun is highest in the sky and its rays are the strongest. Avoid water play during this time of day as the water washes away sweat making it difficult to see how much fluid you or your child has lost. Do errands and outdoor play early or late in the day.
  • Kids will not stop playing to get a drink of water until they are extremely thirsty and by then they've already lost too much fluid. Once thirsty, get kids out of the heat and have them drink plenty water to help their bodies replenish. Prevent dehydration, by drinking small amounts throughout the day as large amounts of water at one time does little to help keep you hydrated.
  • DO NOT LEAVE KIDS IN CARS!! Not for 10 minutes, not for 2 minutes. The temperature in a car can rise over 20 degrees in less than 20 minutes. So on a 98 degree day, you car can go up to 118 in the time it takes you to run the ATM. It maybe inconvenient, but taking them with you is better than taking them to the hospital.


SUN
It wouldn't be summer without the sun, but too much sun exposure can be dangerous. Your body needs sun to make vitamin D, so make sure your kids do get 15 minutes of sunshine a day.
  • Apply (and reapply) sunscreen. Kids of all skin tones and complexions should have on sun block when they go outside.  Apply before heading out and every two hours after.
  • Play in the shade. Make use of the patio or covered deck. Kids will have fun playing in a tent or making one out of a blanket.
  • Cover up. Encourage kids with particularly sensitive skin to wear sun coveralls, wide brimmed hats and sunglasses.
  • Double Check Medications. Some medications have sun exposure warnings. Read carefully to be sure you're taking the proper precautions. Questions: talk to your doctor or pharmacist.


WATER
Water play is one of the best parts of summer time, but it can be dangerous if the right safety measures aren't taken.
  • Teach your kids to swim! This is a great way to help them be safe.
  • NO ONE SHOULD SWIM ALONE! This is true for adults and especially for children. Younger children and weak swimmers should always have an adult within arms reach. Bring the cordless phone outside, or ignore the phone altogether, don't multitask when watching the kids in the pool.
  • Learn the signs of drowning.   Drowning doesn't look like what the TV and Movies portray it as so read up on Drowning and make sure your caregivers do to!
  • Get a Coast Guard Certified life vest. Make sure it fits correctly.
  • Know the waters. Ponds, lakes, beaches and can be unpredictable in many ways: undertows, rough surf, hidden drop-offs, rocks, broken glass, etc. Be aware of where your kids are swimming and playing. Keep them safe by giving them water shoes, life vests, etc. and teaching them to stay near the shore, not to have their backs to the waves, and to swim sideways in caught in an undertow. 

Read More on Sun Safety & Water Safety at the Kids Health website.

Monday, February 14, 2011

Valentines Day Cookies

Regular sugarcookies need not be boring. Have fun making and decorating these.

What You Need: SugarCookie recipe (coming soon) or store bought cookie dough, rolling pin, heart shaped cookie cutter or piece of cardboard, icing, red food coloring, sprinkles, baking sheet, a spatula and butter knife.

What To Do: Prepare cookie dough, flour countertop and rolling pin. Roll out dough and cut cookies. place on cookie sheet and bake.  Once cookies are baked and cool, ice them with icing of your choice, to make red just add a few drops of red food coloring to white icing. Then carefully add sprinkles on top.

if you don't have a cookie cutter draw a heart on a piece of heavy paper or cardboard and carefully cut it out. Use it to trace out heart shape cookies.

No rolling pin? Use a can of corn! or any other can you have in the pantry...

Saturday, December 25, 2010

Stocking Shaped Holidays Cookies

Regular sugar cookies need not be boring. Have fun making and decorating these.

What You Need: Sugar cookie recipe (coming soon) or store bought cookie dough, rolling pin, stocking shaped cookie cutter or piece of cardboard, white icing, red and green food coloring, red sugar sprinkles, baking sheet, a spatula, piping bag or ziplock bag and butter knife.

What To Do: Prepare cookie dough, flour countertop and rolling pin. Roll out dough and cut cookies. place on cookie sheet and bake. While cookies are baking separate white icing into three portions. Color one red, one green and keep on white. Once cookies are baked and cooled, ice them carefully red on the bottom and white on time just like a Christmas stocking. Then carefully add sprinkles on top of red section.


To personalize, use the piping bag (or a ziplock with the corner carefully snipped) to write names on the cookies.

If you don't have a cookie cutter draw a Christmas stocking on a piece of heavy paper or cardboard and carefully cut it out. Use it to trace out the cookies.

No rolling pin? Use a can of corn! or any other can you have in the pantry...

NOTE: If you're using the ziplock, BE VERY GENTLE when piping, as the bag will tear if you squeeze to hard!

Monday, October 25, 2010

Math Monsters

These great homemade goblins are great for Halloween and also reinforce math skills. Use them to help teach shapes, colors, patterns, or even multiplication (3 sets of 2 arms equals 6 arms)

What You Need:  Construction Paper, glue, scissors, crayons and decorations if you have them: googly eyes, pompoms, feathers, yarn etc.

What to Do:  Cut out different shapes of various sizes and put them together to create a "monster". There really is no wrong way to do this, since it's a "monster".  Your child's monster can have three eyes, six legs, a mop of curly yarn hair. Let them be as creative as they want.

For older kids, use brass fasteners to hold the pieces together so that the monster can move. Younger kids can just glue their monsters together.

Thursday, July 29, 2010

Getting Kids Going

Exercise is an important part of growing strong healthy kids. But exercising doesn't have to be the stringent regime and doesn't have to turn you into a Drill Sargent.
Kids who engage in regular physical activity are stronger, more confident, and have a better outlook on life.

Here is a simple guide to helping you little ones get moving and stay healthy.

This is a suggested Activity Chart from Kids Health


Age
Minimum Daily Activity
Comments
Infant
No specific requirements
Physical activity should encourage motor development
Toddler
1½ hours
30 minutes planned physical activity AND 60 minutes unstructured physical activity (free play)
Preschooler
2 hours
60 minutes planned physical activity AND 60 minutes unstructured physical activity (free play)
School Age
1 hour or more
 Break up into bouts of 15 minutes or more

TEENS

Infants and young children should not be inactive for prolonged periods of time — no more than 1 hour unless they're sleeping. And school-age children should not be inactive for periods longer than 2 hours.


Planned play doesn't have to be gymnastics or little league, though those do qualify. It can be as simple as taking a walk, going for a bike ride, dancing, or playing catch. Free Play is just that where you don't guide a child's imagination, letting them climb, spin, run, play tag, whatever there little hearts (& legs) desire.

 Here are a few websites for more information and ideas for helping get your little one in a grove!

Kids Health
Let's Move Iniative
BAM! (Body and Mind) kids health by the CDC
Kids.Gov

Saturday, July 17, 2010

Kiddie Clean Up

Kids are messy. But with a little paitence and  ingenuity you can clear the clutter and organize the chaos (and even get the little ones  to pitch in!)
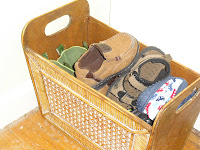
  • Utilize a storage caddy. (The one pictured was $1 at Target) Storage caddies work as both an organizing tool and a nifty clean up device. With small children, Moms can use a storage caddie to keep diapers, wipes, and binkies on hand as you move from room to room or out in the backyard. This way you don't have to keep running back to the changing table. Older kids and toddlers can use them to help clean up their toys, books, shoes, etc. They can load them up and carry them to their room/toy box. They can also help limit the mess by regulating how much a child can take with them. You can keep a child from leaving every toy they own strewn about the house by telling them they can only take out toys that can fit into the caddy and they have to  put back whatever they take out before getting more. This way clean up is always just one caddy load.
  • Stylish and Creative Storage Solutions. Just because you have kids doesn't mean that your personal style has to go out the window. Yes, your furniture should be child friendly - to prevent the heartbreak and tears that come when little chocolate hand prints show up- but you don't have to live in a world of primary colors and cartoon characters.  Use storage ottomans to hide toys and magazine holders to keep little shoes in order without sacrificing decor.  This not only helps your home have a bit of an adult feel, it also helps organize your kids, by giving everything a place and teaching them where to find and put their things.

Saturday, June 12, 2010

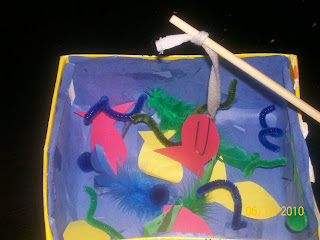
Shoebox Fishing Game

This is the companion game to the box top coin flip game. When made together you can store the pieces inside the box and have two games in one travel case.


What You Need:
Shoebox
Construction paper
Blue & Green Pipe cleaners, pom-poms, feathers
glue
scissors
small magnet
paper clips
tape
yarn
chopstick


What to Do: Line the shoebox with blue construction paper. Glue or tape pipe cleaners, pom-poms, and feathers to act as ocean features.

Cut fish shapes out of a different color construction paper. Attach a paperclip to each fish lining it in up with the fish's mouth.

Make the fishing rod by tying a piece of yarn to the end of a chopstick. tape a small magnet to the end of the yarn.

How to play: Place the fish into the shoebox. Use the rod to try and catch the fish. two players can take turns seeing who can get all their color fish out of the box first.


Wednesday, June 9, 2010

Deciding on Discipline


One of the toughest jobs a parent has is as disciplinarian. It's easy to get swept up in emotion and add stressed, over worked, and over tired to the mix and you'll find yourself yelling and telling your kids to go to their rooms and not to come out 'til they're 30! Here are a few tips on how to deal with disciplining your kids.
This is not a referendum on spanking and having a discussion on how to discipline your child doesn't have to be a to spank or not to spank talk. What techniques you use, are up to you as parents. But the key to a good discipline is consistency.
  • First develop a punishment scale. Not every crime deserves the same punishment. So, don't give small missteps the same consequence as major ones. If you do, there is nothing to keep your child from acting out in a big way; and you'll forever need to think of bigger and badder punishments for them.
  • Avoid open-ended punishment. Make sure the consequence has an specific end time. Whether that's sitting in time out for 5 minutes or no TV for a week, having a set ending for punishments makes disciplining easier for you and the child. This helps keep infractions separate and you can be sure you are properly doling out punishment. It also keeps your child from feeling stuck in an endless cycle, where they need to be perfect. For example if you've taken away the TV for a week and your child misbehaves on the next to the last day, instead of adding another week of no TV, trying taking away phone or internet privileges. This way they feel the immediate sting of losing another privilege, in two days they get back the TV but still have to wait another 4 days for the phone.
  • Breathe. Take some time before doling out the sentence. In the heat of the moment we may not realize what is actually going on. Take a moment, you may remember that you took the frame off the shelf while cleaning and were distracted by a phone call when you told the kids to go play in the den -- Or that your son only hit his sister after being tormented about his new braces for an hour. Do the kids still need to be disciplined yes, but not to the same degree as if these acts were deliberate or unprovoked.
  • Reverse the Strategy. Reward the good behavior with lots of praise and attention. You don't have to bribe them or to shower them with expensive gifts for things like doing homework and cleaning their room. But noticing your kids when they do things right will help keep them from doing things wrong. Try things like letting a avid reader get an extra story at bedtime every day they have their homework done on time and their bed made, or let an outdoorsy kid get ten extra minutes of play just because she asked nicely and didn't whine.
  • Stick to it. Don't let your kids out of a punishment just because you're sick of them being in the house, or because you want to go out. This only teaches children that if they make a nuisance of themselves they'll never really have to finish out a sentence. Instead try a "work-release" program, where they can earn time off their punishment by exhibiting not just good behavior, but unselfish behavior. For example, for every hour they help clean the yard, sort recycling, etc., they get back an hour of playtime.
  • Don't make family time a punishment. As kids get older time with their friends becomes more and more important, but don't try not to force children to spend time with the family because they acted out in school. The last thing you want is for your kids to hate spending time with you as a family.
  • Be a Role Model! Modeling good behavior for your kids is prime. Treat them with respect and they will being to show respect to others, their friends and to you! Kids are smart and they pick up on things very quickly. Soon you will see a positive shift with less and less time and effort spent on correcting bad behavior.

Tuesday, June 8, 2010

An Afternoon of Summer Fun


With five items that you can find in the dollar store and a hot summer afternoon you can have a world of fun! What you need: A hula hoop, a bouncy ball, a laundry basket, a pack of water balloons, and two beach buckets. Aside from the obvious games, here are a few other games you can play to entertain your little ones!


1) Snowcone Relay: Place the bouncy ball on top of one bucket, set up obstacles -like going around trees, down the kiddie slide, over the laundry basket, hoping through the hula hoop- and have kids take turns going through obstacles and pass the ball from bucket to bucket without using hands.

2)Laundry Basket Ball: toss, bounce, or roll the ball into the laundry basket using the buckets, and the hula hoop as obstacles to make it more difficult. Example, place the basket on its side and place the hula hoop a few feet away with the buckets upside down to form two towers half way between the hoop and the basket. Have your child stand in the hoop and roll the ball between the buckets and into the basket.

3) Target Practice: Place the hula hoop on the ground with a bucket in the center making a target. Standing a few feet away, toss filled water balloons at the target.

4) Dodge Balloons: Place the buckets a few feet away from each other with the laundry basket in the middle and put a bunch of filled water balloons in the laundry basket. Stand next to a bucket, on "Go" race to the basket and grab a balloon, race back to your bucket and toss the balloons into the other bucket, try blocking the other persons balloons from getting into your bucket.

More Water Games to Welcome Summer.

(Photo by Tom Anthony)

Saturday, May 29, 2010

Box Top Coin Flip Game

This is one craft that will be fun long after the glue dries!

What You Need: a shoebox top, felt, marker, glue, scissor, a coin or button

What to Do: Cut the felt to line the inside of the box top and glue it in place. Then cut shapes with other remnants of felt to create scoring sections. Use the marker to write values on the felt shapes. Glue them randomly on the felt inside the box top to create the game board. Let dry.

How to Play: take turns flipping the coin or button into the box top. Earn points by getting the coin to land on one of the scoring sections. After 5 rounds the player with the most points wins.


Pair with the Shoe Box Fishing Game for two games in one box!

Monday, May 24, 2010

5 Games to Play with an Alphabet Mat

An alphabet mat is a wonderful teaching and play tool. the vibrant colors and washable foam make it great for even the youngest of kids. There are several obvious ways to play, but here are 5 unconventional games to play:

1) Alpha-Hop Scotch: It's just as you would imagine. Make a hopscotch grid with a few letters from the mat. As you hop down have your child say the letter they land on. For kids learning to read, have them make each letter sounds. And older kids can say a word that begins with that letter. (Note: use consonant blends as the double rows: BL, WH, ST, FR, PL)

2) Alpha-Twister: Again it's very much like the what you would think... You can play this one is a variety of ways, again by letter, letter sound, beginning letter, even color, or use all 4. Just write out the letters, colors, and words on strips of paper and place them in a hat. (Or if you have Letter Flash Cards use them). In another pile write out Left Hand, Right hand, Left Foot, Right Foot. Pick one card from each pile. Examples: Left Hand A; Right Foot 'Ssss'; Left Foot Blue: Right hand on the first letter in the word Pear. Use what ever works for you and your kids.

3) Rhyming Word Families: This is more of using the mat as a teaching tool. Put together the root of a word family, ie: -AT. Then have your child find the letters that will make rhyming words. Help them to sound out each of the words. M-AT; B-AT, C-AT, P-AT, F-AT, H-AT, FL-AT, R-AT, S-AT....

4) Alpha-Boggle: Lay out the mat in a 4x4 square A,E,I,O, U, R,S,T,L,N,P,B,D,C,H,M using the letters and have your child search for words by connecting letters.

5) Letter Train: Have your child put a random selection of letters in a row, then help them identify each letter and the sound it makes. For older kids, have them make up a story using the letters, example, if the letters are O, C, D, E, W, F,A, S: You might say, One Cold Day, Edward Went For A Swim; or Octopus Carl Dove Every Week For An entire Summer...


Tuesday, May 18, 2010

Virtual Vacations


For awhile now, I've wanted to do a collection of posts dedicated to traveling without actually leaving home. The focus of these Virtual Vacations is to give you and your child a series of activities to do surrounding one central theme that could be focused into one day or over a weekend.


For each Virtual Vacation, you'll find recipes, crafts, fun facts, book suggestions, games and activities that will allow you and your child to be transported to another culture.

Virtual Vacation Destinations:
Spain
Australia
South Africa - Coming Really Soon!

Sunday, May 16, 2010

Meditation for Kids

There are many benefits associated with meditation and recently this group of relaxing techniques has been touted as a wonder-therapy for kids with ADHD. however when you have kids, any amount of time spent in silence seems to be just a myth. Exposing children, even young ones, to the beauty of silence helps them relax their minds & bodies and also prevents over stimulation. There are hundreds of ways to introduce children to meditation; here are a few tips and suggestions to help you find what works for you and your little one.

  • Meditation shouldn't be a punishment or a chore. Do not pressure children to mediate; let them gravitate to it on their own. Not everyone will be moved to meditation and no one should be forced if they are not ready; it defeats the purpose. So, make sure you introduce meditation in a positive way, and present a variety of options so the child understands that your not simply looking for a few minutes of quiet.
  • Don't over do it. The general rule is 1 minute of silence for every year of life. So don't stress yourself trying to get your two year old to sit still for an hour. Begin by using the meditation as a warm up or cool down to other activities and do not overwhelm young ones with too much explanation or complexity.
  • Start out as something you do together. Avoid making it a competition. It's not about who can be quiet the longest. Instead use the time to bond. Whether its just quiet time, or you introduce stretching, walking, or yoga; Let this be time where it's you and your child; no phone, no TV, no visitors. Soon your child will look forward to having uninterrupted time with you.

For Ages Birth - 1
As you can probably imagine, this really isn't meditation. Its basically carving out a time where you and your child sit quietly. No TV, no music, no distractions. Maybe just rocking them gently while deep breathing or humming a soft lullaby.

For Ages 1-4
Once children are mobile and on the move, it's harder to get them to sit quietly. If introducing them at this stage, use meditation as a opening act for something else. Example, go for a short walk and say, "Before we go for our walk we need to get ready." Then help your child sit on the floor and do simple stretches and breathing. After your walk, have the child repeat the stretching and breathing exercises.

For Ages 5-7
Start with guided meditations that will allow you to develop something that is more like story telling and gradually get them to a place where they are guided by their own thoughts and imaginations. Have them visualize walking on a beach and watching the waves, or sitting in the grass watching the flowers sway in the breeze.

For Ages 7-10
At this age, you can begin to introduce self-reflection. Begin with a guided meditation and then ask simple questions like, "Did something upset you today?" or "What can you do to be a better friend/student/brother?". No answers are needed aloud. This is a time for the child to look inward and have some self-reflection and you will be teaching them to ask these kinds of questions of themselves.

Note: It is important that both you and the children are dressed comfortably - preferably sweats/shorts and a t-shirt - and to not be hungry, tired or sleepy. You and your child shouldn't be distracted by an itchy sock or a grumbling belly. Also note that you do not need any special mood-setting paraphernalia like candles, music or special aromas. All you need is space and quiet.

Saturday, May 15, 2010

What Every Craft Kit Should Have


Arts & Crafts are a fun and easy way to spend an afternoon with your children. When its raining out or if you just want to do something different, crafts engage kids imaginations, their minds and their hands. There are endless craft ideas and you can always do a good ol' fashion collage or finger painting. But having a well stocked craft kit will give you and your child endless options when looking for a new activity. Here are a few suggestions to get your kit started and some ideas of how to grow your kit.


The Must-Haves
1) Construction Paper
2) Glue - liquid and stick form
3) Felt - a variety pack of remnants
4) Crayons - non-toxic and washable
5) Safety Scissors

The Secondary Essentials - all in various sizes and colors
1) Pom-Poms
2) Pipe Cleaners
3) Feathers
4) Popsicle sticks
5) Ribbon/Yarn

The Household Necessities -
1) Flour
2) Newspaper
3) Empty soup cans
4) Clear tape
5) Paperclips

Other
1) Finger paints
2) Markers
3) Kraft paper
4) Buttons
5) Shoe boxes

Thursday, May 13, 2010

Create a Book & Bookmark Craft


It wouldn't be Book Week without a Book themed craft. Here are two classic crafts: a memo book and bookmark.

What You Need: a file folder or poster board, construction paper, plain white paper or lined paper, glue, a pipe cleaner, piece of ribbon, hole puncher, decoration of your choosing


What to Do:
Cut the file folder/poster board into three rectangles (a front cover, a back cover and a long thin rectangle for the bookmark). Then cut the construction paper to fit on top of the file folder. Lastly cut the plain paper to fit inside the covers as pages.

Let your child decorate the construction paper.

MEMO BOOK:
Glue the corresponding construction paper pieces onto the front and back cover file folder pieces. Put the plain paper in between the two covers, making sure the decorated side are facing out. Using the hold puncher make holes down the left side (or across the top) of the book. Finally thread the pipe cleaner through the holes to make a spiral style memo book.

BOOKMARK:
Glue the decorated construction paper onto the long thin file folder piece. Use the hole punch to make a hole in the center along the top of the bookmark. Lace the ribbon through and double knot it to secure it in place.

Wednesday, May 12, 2010

Story Time Finger Plays


In celebration of Children's Book Week, here is a way to help young children become young readers. Act out the stories in almost any book using toys, action figures, or make your own finger puppets.

A story time finger play can be anything you'd like, from retelling the story in your own way, to reading the book aloud and acting it out as you go; there's no wrong way to make a book come to life.


Using some simple materials you can turn just about any book into an interactive finger play.

What You Need: Construction Paper, Scissor, Crayons, a Glue Stick

What to Do: Cut the construction paper into strips with a rectangle sticking up (see photo). Decorate the rectangles to look like each character ( example the photo shows Red Riding Hood and the Wolf). Then wrap the strips around your fingers and glue the edges together.


Friday, May 7, 2010

Super Simple Pin Wheel Craft


This craft is so simple and easy you can do it for any occasion holidays, play-dates, parties or just an quiet Spring afternoon!

What You Need: 2 pieces of construction paper, crayons/markers, scissor, glue stick, pipe cleaner, 1 chopstick/un-sharpened pencil

What To Do:Cut the paper into squares by folding one corner up to meet the top edge and then trimming off the rectangle that is left. Let your child decorate one side of each square. When they are done. Cut in from each corner - as if you were going to cut the squares into triangles. Poke a hole in each of the four corners and on in the center of the square. Carefully pull the corners with the holes to line them up with the one in the center. Lace the pipe cleaner through and make knots on each side, then attach the pipe cleaner to the chopstick.


Thursday, May 6, 2010

Homemade Bubble Solution

As Spring gives way to Summer you and your little ones will be spending more time outdoors. When kids play with bubbles they learn about cause and effect - blow and it makes a bubble, science - basic physics, and hand-eye coordination - tracking and aim! Heres a quick recipe for some sunshine fun!

1/2 cup of dishwashing liquid
2 cups of water
2 tsp of sugar

Dissolve the sugar in the water then add the dishwashing liquid. Place in a shallow pan. Use pipe cleaners, old bubble wands, cookie cutters or your hands to make lots and lots of bubbles!

Monday, May 3, 2010

Tessellations


Tessellation is just a fancy math word for tiling or a repeating pattern. Simple tessellations are all around us: bathroom tile, a brick wall, a honey cone. Simple tessellations are easy and fun to find and make!

But you can have your little one exercise their math muscles by creating their own complex tessellation.


For A Simple Tessellation:

What You Need: a piece of paper, a small simple shape (Triangle, Rectangle, Square or Hexagon) crayons or markers.

What To Do: Trace the simple shape over and over again until it covers the piece of paper. The let kids color to create patterns.

For A Complex Tessellation:

What You Need: A piece of paper, a second piece of paper cut into a small square, a scissor, a pencil, tape, crayons or markers.

What to Do: Have your child draw along one edge of the small square. Carefully cut along line and tape the cut out to the opposite end of the square. (i.e. draw and cut out a triangle along the bottom edge, then tape the triangle to the top so that you have what looks like a house with a large triangle door.) The objective is to be able to fit the square like a puzzle piece into itself over and over again. You can repeat this with the other straight edges of the square.

Then help your child trace the new shape over and over until you've tiled the entire piece of paper. Once the paper is tiled completely, then let your child color in the tiles any way they choose. With patterns or randomly.

Suggestions:
-Estimate then count how many shapes it will take to cover the piece of paper.
-Guess then test how many different colors you would have to use to color the entire tessellation without letting tiles of the same color touch.

Thursday, April 29, 2010

Mother's Day Craft That's Not a Flower or a Picture Frame


In an effort to add to the classics, here's a new Mother's Day Craft! Make Mom this cute candy dish to put her keys, change, jewelry, cell phone, pacifiers - whatever trinket she can't keep track of!

What You Need:
for the paper mache' bowl: a few sheets of newspaper, flour, water, school/craft glue, small plastic bowl (small plastic takeout containers work well), large bowl, safety scissors

to construct: a sheet of felt,a piece of thick ribbon, paint/markers, decorations


What to Do:
Make the paper mache a day or two a head of time to allow it enough time to harden before decorating.

Cut the newspaper into strips and set aside. Then combine 1/4 cup of flour and 1/2 cup of water in a large bowl. Then add a few squirts of school glue. This will help make your bowl sturdy, however if you have very little ones or are concerned about your kid eating glue, then leave out this step. The bowl will come out just fine.

Turn the small bowl over, then help your child dip the newspaper strips into the flour-water mixture and cover the bottom of the bowl as if you were making a cast. make sure you cover the bottom completely, if the sides of your bowl are really deep you can stop at whatever you think is a good height for your dish.

Once the bowl is covered, run your finger over it to smooth out the edges as best you can and squeeze out some of the extra water. Let it sit and dry - it may take a few hours to a few days. (If you are pressed for time, you can use a blow dryer to hurry it along.)

After it is dry, carefully separate the paper cast dish from the small bowl. Trim down any uneven edges. Glue felt inside the dish to make a nice, scratch free surface for mom's things. Then let kids decorate the outside of the dish with paint, buttons, stickers, etc. When it is all decorated, use a piece of thick ribbon to cover the top edge and create a more polished look.