Showing posts with label activities. Show all posts

Friday, February 25, 2011

Cardboard Box Robot Costume

Homemade costume for Halloween or anytime!

What You Need: A cardboard box, Silver spray paint, Razor/Box Cutter, silver pipe cleaners, roll of duct tape, brightly colored buttons & gems, glow sticks, anything else you can find, glue


What To DoADULTS Measure and trim the cardboard box to fit your child, making sure to make arm and head holes that will not obstruct child's movements. You may need to cut the pieces and tape them back together to get the right fit. Once you have the right fit them spray paint it silver and let dry -  make sure you spray in a well ventilated area and away from children!! 

Once the base is dry, let children help you determine where the robot's buttons, knobs, screens, lights, and switches will go and glue the decorations in place. SOME MAY NEED TO BE HOT GLUED!  Also make sure you activate the glow sticks- if using them- before gluing them on.

Note: You can make the back with a slit, so that children can put it on without putting the box over their heads

The hat and shoes are a spray painted party hat and a shoe box top.

Tuesday, January 25, 2011

Snake Decorations

This is a simple and easy craft activity that kids can make anytime and makes a wonder party craft because once they are done you can use them as decorations!

What You Need: Construction Paper, crayons/markers, decorations, ribbon

What To Do: Draw a large spiral on the construction paper at the end create an egg shape for the head. (If making decorations you needn't create the egg shape) Let children color and decorate BOTH SIDES how ever they choose. Don't forget the eyes. ADULTS carefully cutout the snake/spiral and put a small hole in its tail for the ribbon.

Hang & Enjoy!

Friday, November 19, 2010

The Family Turkey

Here's one activity that will allow the whole family to get involved in hunting for materials to make your turkey one of a kind.

What You Need: a turkey coloring page print out, glue and whatever you can find to decorate.

What To Do: As a family talk about what you want your turkey to look like: life-like, colorful, cartoonish, etc. then hunt for materials to decorate your turkey. (You can use grains of rice, stripes of material, leaves, tissue paper, crayons, glitter, ANYTHING that you can get to stick to the paper!! Ours has feathers, felt and a tissue paper beak)

Cornacopia: The Horn of Plenty

This is a super simple Thanksgiving craft that's great for small hands and older children. It's easily adaptable and can be made as simple or as complex as you (and your child) can imagine.

What You Need: A stripe of construction paper; glue, tissue paper, pom-poms, other small trinkets and decorations

What To Do: Roll the strip of construction paper into a cone shape that has a point (think waffle cone). Stuff the horn with colored tissue paper and then add pom poms and other decoration to be the "food" in the horn.

Sunday, August 15, 2010

Mancala Game

This is the easiest homemade game ever! This is a popular game in Africa and Southeast Asia. It's popularity is due mostly to the fact that it cost next to nothing to make.

What You Need: A egg carton, 48 tokens (seeds, pebbles, pennies, dimes, buttons, paper clips, beads, etc), two small cups

What To Do: Carefully cut the top off the egg carton, leaving just the bottom. Put 4 tokens in each of the egg carton cups, or "houses". Place the egg carton between the two players with a cup at either end. The six houses closest to you are your houses.

The object of the game is to empty your houses  before the other player. Players alternate turns. On their turn each player picks up all the pebbles from one cup on their side of the board and places them one by one in the cups around the board in a counter-clockwise direction (to the right on your side, then to the left on the opponents side), including his cup, but not in the opponent’s cup.

BONUS:  You can have kids decorate the egg carton and cups before playing. 

There are many different ways to play this game so look some up or make up your own!

Saturday, August 14, 2010

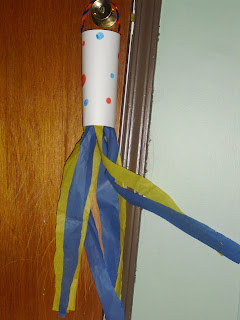
Wind Sock

This is another creative and fun craft to help your kids to enjoy the outdoors this summer. You can use up all that left over streamer/tissue paper that has been collecting from parties and gift wrapping.

What You Need: 
1 piece of card stock/heavy paper
Streamers or colorful tissue paper cut into strips
Glue/Tape
crayons/markers/glitter/etc
pipe cleaners

What To Do:
Have children decorate the card stock however they'd like. When they are finished help them construct their windsock by gluing/taping strips of streamer/tissue paper along the edge of the back of the cardstock. Roll the card stock into a tube so that the streamers hang from the inside and the decoration is on the outside. Glue/tape closed. Create a handle on the top of the windsock by twisting two pipecleaners together and taping them to the inside of the cardstock like a rainbow.

Tuesday, August 3, 2010

Felt Roads

Here is a simple way to help give your little ones Matchbox' and Hot Wheels a place to drive - that's not the edge of furniture, your leg, or expensive plastic track sets.

These customizable felt roads are easy to make and inexpensive. They can be arranged and re-arranged over and over in any combination your child can imagine.


What You Need: Black Felt, Yellow/White felt, scissor, craft glue, cardboard

What To Do: Cut the black felt into strips wide enough to drive a toy car on. Cut the yellow felt into thin strips and then cut those into strips about an inch long. Glue the small yellow strips onto the black felt roads and Viola! You're done. Use the cardboard as backing to make them extra durable. 

Tips: Because you're making them you can cut out whatever kind of roads you want: soft curves, corners, Y-shaped merges, 4 laned highway,  S-shaped zigzags. 

Store your roads in an hard pencil case or an old wipe container. 

Use them with train tracks, lincoln logs, plastic trees etc.

Tuesday, July 13, 2010

Homemade Marionettes

These homemade marionettes are fun to make and provide hours of fun once completed. Make a bunch and put on your own retelling of your favorite fairy tales- Or make up your own! This is the perfect rainy day activity as it takes some time to put together and then provides hours of fun when done!

What You Need: Plastic cups of various sizes (one large & 5 medium per puppet), Yarn, cardboard, felt & decorations, glue, scissors,

What to Do: 

Parents may want to do these first steps before hand, so that children just have to decorate and assemble.  
  • Cut a lower case "t" out of cardboard for the puppet control and poke a hole in each of the four ends.
  • Put a slit or small hole in the bottom of each plastic cup. 
  • Put a slit or small hole in the back of the large cup (Body) and two of the smaller cups (hands) near the lip. Leave the  head and feet cups with just holes in the bottoms.
  • Put two slits on the side of the big cup near the bottom of the cup. These will be where the arms attach.
Once all the cutting is done, you & your child can assemble and decorate your marionette.
  1. Tie a knot on the end of the yarn and slip it through one of the arm holes. Cut a length of string as desired for arms. Slip the end of the yarn through the bottom of one of the hand cups (a cup with a hole in the bottom and side). Repeat on the other side. 
  2. Slip the yarn through the hole in the bottom of the large cup, the body. Pull a large length (excess can be trimmed later) through - think of this string as the spine of the puppet, connecting the head to the legs. Cut and tie knot in the end closest to the bottom of the cup (top of the puppet) Slip the knot through the bottom a small cup (head) so that the bottoms are facing each other. (Make sure to leave a bit of yarn for the neck and a bit to attach to the control.
  3. Cut a length of yarn for the legs, tie it at the midway point to the "spine"  so that you have to equal length legs hanging from inside the body. Slip one end of the yarn through a foot cup and tie a knot to secure. Then repeat with the other leg and foot. At this point your puppet should be complete (without the controls) and look like the picture below (it's sideways  now but this will be corrected shortly).
Decorate the Puppet with felt, pom poms, feathers and attach with the glue. Use permanent marker to draw a face.

For the controls:
  • Slip lengths of yarn through each of the holes in the cardboard cut out. 
  • Attach the top of the "t" to the yarn inside the head. 
  • Attach the sides of the "t" to the hands (again by slipping into the holes in the sides of the hand cups.
  • Attach the bottom of the "t" to the body by slipping the yarn into the hole in the back of the body near the lip. 

Once it's dry, Practice using the controls  to manipulate your puppet.

Monday, July 12, 2010

Plastic Spoon Puppets

This is a cheap and easy craft that you can do again & again  and can lead to hours of role playing fun!

What You Need: 
Plastic Spoons, Felt, Permanent Markers, Scissor, Glue, Pipe Cleaners

What To Do:
Draw faces on to the back side of the spoons with permanent markers. Carefully cut clothing, hair, hats, etc from felt. (Note: Fold clothing in half and use scissor to make a slit to slide spoon handle in) Glue hair on spoon. Wrap a pipe cleaner around the handle to make arms.

inspired by a post by Inspired Crafter

Sunday, July 11, 2010

Stick Raft

A great craft that you can do with items from the backyard!  Have the kids gather the supplies, construct rafts and find a puddle and race!

What You Need:
Sticks, twine/thread, leaf/paper

What To Do: Gather enough twigs and sticks to make a raft base, one longer twig for a mast, and four to help steady and brace the raft.  Break or snip the branches for the base with garden shears to make them almost even - doesn't have to be perfect.  Lay the twigs side by side, holding them firmly, lace the thread around the edge of  the sticks, weaving over and under until they are secure. Repeat on the other edge. Take the four twigs you gathered for bracing the raft and split into two groups of two. Tie the two twigs of each group together. Attach one group onto the base at the back on the other to the front going across (opposite) the twigs of the raft. The raft should now be firm and steady with relatively little wiggle. Turn over and work the longer mast twig in between the twigs of both the base and the front brace. Use a large leaf or a piece of paper to attach to the mast as a sail.

You now have a stick raft, that floats!

Friday, June 25, 2010

Fun with Pen & Paper


You don't need a lot of fancy toys to have big fun. Here are three activities for you and your little ones and all you need is a crayon and a sheet of paper (or more for more fun!) These are also great if you have to take your kids to work and they need something to do!


Copy Cat - Give each person a sheet of paper and a crayon. The first person draws a shape. Everyone else then has to copy that shape on their own sheet. The next person adds to the drawing, everyone then copies that on their sheet. Continue until everyone has had a turn or keep going until everyone decides that the picture is complete. Notice how similar yet different everyone's picture is.

There once was a Girl... - Again give each person a sheet of paper and access to crayons. Everyone then has to draw the following sentence: There once was a girl, who lived in a house, under a tree, next to a river.  (You can say the whole sentence at once or one piece at a time). Again compare and contrast how different their girls, houses, trees, and rivers are.  You can try these other sentences:
There once was a boy wearing a hat who lived on a farm with lots of animals.
There once was a frog, who lived on a rock next to a lake with lots of birds.
There once was a puppy who was digging a hole next to some flowers in the backyard.
Or Make up your own!

Three Piece Suit - Give each person a piece of paper and a crayon. Fold the paper into three sections. On your piece of paper draw a head and shoulders in the top section making sure the shoulder lines go just slightly over the fold. Decorate it how ever you'd like 2 eyes, 1 eye, 6 eyes! no mouth, curly hair whatever you'd like. It could be a potato head, a lions head anything goes! When you're done fold your paper so that the next section shows but not the head. Switch with another person. Now everyone draws the torso of whatever character they'd like: it doesn't  have to be the same one you drew before, again anything goes. No arms, six arms, fur, a dress, a bow-tie. Again draw all the way to the hips making sure the lines go just slightly over the fold. Fold the page again and switch: now everyone draws legs and feet being as creative as they want.  When everyone is done unfold the pages and see what kind of Creations you've come up with!

Monday, June 21, 2010

Summer Fun!

Welcome Summer! Today is the first day of Summer and here are a few activities to welcome the sunshine and beat the heat!

Garden Hose Limbo: Create a straight stream by holding your thumb on the end of the garden hose, if you don't have a nozzle, and let kids limbo under it.

Sponge Race: Fill a kiddie pool (or other large bucket), set up small beach buckets  a few feet away. Using larger sponges have kids soak up water in the kiddie and race to fill up their beach bucket.

Water Balloon Race: Fill a beach bucket with water balloons and let kids race to see who can pop all their water balloons first. Add crazy rules like not being able to use your hands and watch kids stuff their shirts with balloons and roll on the floor!

Click here for more Summer Games

painting by: allisa rachelle

Rocket-ship Fruit Skewers


A summery fun way to get kids to eat (and play with) their fruit!

What You Need: Fruit any kind: Strawberries, Bananas, Watermelons, Cantaloupe, Honeydew, Peaches, Plums, Cherries, Pineapples.... really any kind; Skewers or Chopsticks if you have small children

What To Do: layout the fruit and let the children build a rocket ship, using a Banana or Strawberry tip as the nose of the rocket. 

Then Eat!

Sunday, June 13, 2010

Father's Day Pillow Craft

Make Dad this simple throw pillow. It's a great way to say Happy Father's Day and perfect for little hands to make.

What You Need:
two pieces of felt , Scissors, Fabric Glue, Cotton stuffing and any other ornaments and decorations you'd like - fabric glue, felt letters & Shapes, buttons etc.

What To Do:
Take a piece of felt and let your kids decorate it by drawing with fabric paints, attaching felt letters and personalizing for dad. Craft stores sell pre-cut felt letters and shapes, so you don't have to try and cut out a set of golf clubs to stick on your pillow.

Then using fabric glue, close up three sides of the pillow by gluing the edges of the front felt to the back piece. Once dry stuff with the cotton and seal the last edge closing the pillow.


For very small kids, you can dip their hands in fabric paint and press onto the felt to make a handprint pillow keepsake.

Another fathers day idea is the Change Dish that was posted for Mother's Day!

Saturday, June 12, 2010

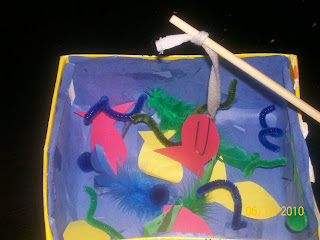
Shoebox Fishing Game

This is the companion game to the box top coin flip game. When made together you can store the pieces inside the box and have two games in one travel case.


What You Need:
Shoebox
Construction paper
Blue & Green Pipe cleaners, pom-poms, feathers
glue
scissors
small magnet
paper clips
tape
yarn
chopstick


What to Do: Line the shoebox with blue construction paper. Glue or tape pipe cleaners, pom-poms, and feathers to act as ocean features.

Cut fish shapes out of a different color construction paper. Attach a paperclip to each fish lining it in up with the fish's mouth.

Make the fishing rod by tying a piece of yarn to the end of a chopstick. tape a small magnet to the end of the yarn.

How to play: Place the fish into the shoebox. Use the rod to try and catch the fish. two players can take turns seeing who can get all their color fish out of the box first.


Friday, June 11, 2010

Homemade Miniature Golf


What You Need:
metal curtain rod - separated to make 2 clubs
newspaper
old socks
a high bounce ball/tennis ball/ or handball
a shoebox

What To Do:
Make the clubs by separating the curtain rod and covering the ends with newspaper. Pad it up good for safety and to give kids a large area to strike the ball with. Cover the newspaper with a pair of old socks - one on each end. This is also a good way to help distinguish clubs - your club has your socks on it.

Use the shoebox as the hole, but cutting an archway into one end, and you are ready to play.

Indoors you can use furniture, shoes, cups, broomsticks etc as obstacles. Outdoors grass and concrete can act as rough and fairway, trees, hula hoops, buckets, etc can be obstacles. Make your course as easy or as hard as you want. Just place the shoebox down, arrange obstacles and putt!

Thursday, June 10, 2010

Virtual Vacation: Destination Australia - Games & Activities

Down, Down, Down!

What you Need: a tennis or hand ball - that's it!

What To Do:
Bounce the ball between players, when a player misses the ball the other player says "Down on one Knee" - the player who missed must then continue to play but know from a kneeling position. If that player misses again then they go down on two knees, then one elbow, two elbows and finally the chin when they can no longer throw and catch the ball. The winning player is the one last one left when all other players are out - if playing with more than two players.

What Time is it Mr. Wolf?

This game is very similar to Mother May I? with a twist. One player is the wolf the others stand at a starting line. Players then ask "What Time is it Mr. Wolf?" the wolf will respond with "It's -O'clock" then players then take as many steps as hours the wolf says ie 10 o'clock is 10 steps and 7 o'clock is 7 steps. When the Wolf chooses he can respond with "Dinner Time!" at which the players must reach the start line before getting caught. The caught player becomes The wolf. Or if a player reaches the wolf before "dinner time" they can become the Wolf.

Virtual Vacation: Destination Australia -Crafts

Didgeridoo

A Didgeridoo is an Aboriginal instrument usually made the the hollow branches of a tree. Each maker has their own unique symbols, carvings and designs, making this the perfect craft to allow kids to express their own individual creativity.

What You Need:
1 wrapping paper tube, or a few paper towel or toilet paper tubes, tape, scissors, glue, plain white paper or kraft paper, crayons/markers

What To Do:
If using more than one tube then tape them together end to end to create one long tube. Cut the white paper or kraft paper so that it will wrap around the tube without any overlapping. Allow kids to decorate the paper in their own designs. Once done, glue the paper around the tube.

When it's dry children will have a one of a kind instrument. Blow into one end with clicks, moans, hums, and make your own Didgerdoo music.


Boomerang
No trip to Australia would be complete without a boomerang. Make your own in two easy steps

What You Need:
Cardboard
paint/markers/crayons
x-acto knife or box cutter

What To Do:
!!ADULTS!!! cut out a boomerang shape (a wide V) from the cardboard.

Let children decorate - for a true Australian feel dip paint with a chopstick or q-tip to get line, and dots.


Tuesday, June 8, 2010

An Afternoon of Summer Fun


With five items that you can find in the dollar store and a hot summer afternoon you can have a world of fun! What you need: A hula hoop, a bouncy ball, a laundry basket, a pack of water balloons, and two beach buckets. Aside from the obvious games, here are a few other games you can play to entertain your little ones!


1) Snowcone Relay: Place the bouncy ball on top of one bucket, set up obstacles -like going around trees, down the kiddie slide, over the laundry basket, hoping through the hula hoop- and have kids take turns going through obstacles and pass the ball from bucket to bucket without using hands.

2)Laundry Basket Ball: toss, bounce, or roll the ball into the laundry basket using the buckets, and the hula hoop as obstacles to make it more difficult. Example, place the basket on its side and place the hula hoop a few feet away with the buckets upside down to form two towers half way between the hoop and the basket. Have your child stand in the hoop and roll the ball between the buckets and into the basket.

3) Target Practice: Place the hula hoop on the ground with a bucket in the center making a target. Standing a few feet away, toss filled water balloons at the target.

4) Dodge Balloons: Place the buckets a few feet away from each other with the laundry basket in the middle and put a bunch of filled water balloons in the laundry basket. Stand next to a bucket, on "Go" race to the basket and grab a balloon, race back to your bucket and toss the balloons into the other bucket, try blocking the other persons balloons from getting into your bucket.

More Water Games to Welcome Summer.

(Photo by Tom Anthony)

Saturday, May 29, 2010

Box Top Coin Flip Game

This is one craft that will be fun long after the glue dries!

What You Need: a shoebox top, felt, marker, glue, scissor, a coin or button

What to Do: Cut the felt to line the inside of the box top and glue it in place. Then cut shapes with other remnants of felt to create scoring sections. Use the marker to write values on the felt shapes. Glue them randomly on the felt inside the box top to create the game board. Let dry.

How to Play: take turns flipping the coin or button into the box top. Earn points by getting the coin to land on one of the scoring sections. After 5 rounds the player with the most points wins.


Pair with the Shoe Box Fishing Game for two games in one box!