Saturday, December 25, 2010

Stocking Shaped Holidays Cookies

Regular sugar cookies need not be boring. Have fun making and decorating these.

What You Need: Sugar cookie recipe (coming soon) or store bought cookie dough, rolling pin, stocking shaped cookie cutter or piece of cardboard, white icing, red and green food coloring, red sugar sprinkles, baking sheet, a spatula, piping bag or ziplock bag and butter knife.

What To Do: Prepare cookie dough, flour countertop and rolling pin. Roll out dough and cut cookies. place on cookie sheet and bake. While cookies are baking separate white icing into three portions. Color one red, one green and keep on white. Once cookies are baked and cooled, ice them carefully red on the bottom and white on time just like a Christmas stocking. Then carefully add sprinkles on top of red section.


To personalize, use the piping bag (or a ziplock with the corner carefully snipped) to write names on the cookies.

If you don't have a cookie cutter draw a Christmas stocking on a piece of heavy paper or cardboard and carefully cut it out. Use it to trace out the cookies.

No rolling pin? Use a can of corn! or any other can you have in the pantry...

NOTE: If you're using the ziplock, BE VERY GENTLE when piping, as the bag will tear if you squeeze to hard!

Friday, November 19, 2010

The Family Turkey

Here's one activity that will allow the whole family to get involved in hunting for materials to make your turkey one of a kind.

What You Need: a turkey coloring page print out, glue and whatever you can find to decorate.

What To Do: As a family talk about what you want your turkey to look like: life-like, colorful, cartoonish, etc. then hunt for materials to decorate your turkey. (You can use grains of rice, stripes of material, leaves, tissue paper, crayons, glitter, ANYTHING that you can get to stick to the paper!! Ours has feathers, felt and a tissue paper beak)

Cornacopia: The Horn of Plenty

This is a super simple Thanksgiving craft that's great for small hands and older children. It's easily adaptable and can be made as simple or as complex as you (and your child) can imagine.

What You Need: A stripe of construction paper; glue, tissue paper, pom-poms, other small trinkets and decorations

What To Do: Roll the strip of construction paper into a cone shape that has a point (think waffle cone). Stuff the horn with colored tissue paper and then add pom poms and other decoration to be the "food" in the horn.

Monday, October 25, 2010

Math Monsters

These great homemade goblins are great for Halloween and also reinforce math skills. Use them to help teach shapes, colors, patterns, or even multiplication (3 sets of 2 arms equals 6 arms)

What You Need:  Construction Paper, glue, scissors, crayons and decorations if you have them: googly eyes, pompoms, feathers, yarn etc.

What to Do:  Cut out different shapes of various sizes and put them together to create a "monster". There really is no wrong way to do this, since it's a "monster".  Your child's monster can have three eyes, six legs, a mop of curly yarn hair. Let them be as creative as they want.

For older kids, use brass fasteners to hold the pieces together so that the monster can move. Younger kids can just glue their monsters together.

Sunday, August 15, 2010

Mancala Game

This is the easiest homemade game ever! This is a popular game in Africa and Southeast Asia. It's popularity is due mostly to the fact that it cost next to nothing to make.

What You Need: A egg carton, 48 tokens (seeds, pebbles, pennies, dimes, buttons, paper clips, beads, etc), two small cups

What To Do: Carefully cut the top off the egg carton, leaving just the bottom. Put 4 tokens in each of the egg carton cups, or "houses". Place the egg carton between the two players with a cup at either end. The six houses closest to you are your houses.

The object of the game is to empty your houses  before the other player. Players alternate turns. On their turn each player picks up all the pebbles from one cup on their side of the board and places them one by one in the cups around the board in a counter-clockwise direction (to the right on your side, then to the left on the opponents side), including his cup, but not in the opponent’s cup.

BONUS:  You can have kids decorate the egg carton and cups before playing. 

There are many different ways to play this game so look some up or make up your own!

Saturday, August 14, 2010

Wind Sock

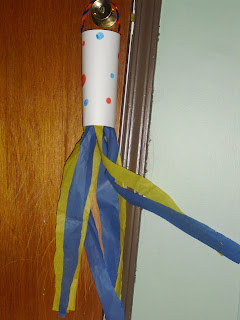
This is another creative and fun craft to help your kids to enjoy the outdoors this summer. You can use up all that left over streamer/tissue paper that has been collecting from parties and gift wrapping.

What You Need: 
1 piece of card stock/heavy paper
Streamers or colorful tissue paper cut into strips
Glue/Tape
crayons/markers/glitter/etc
pipe cleaners

What To Do:
Have children decorate the card stock however they'd like. When they are finished help them construct their windsock by gluing/taping strips of streamer/tissue paper along the edge of the back of the cardstock. Roll the card stock into a tube so that the streamers hang from the inside and the decoration is on the outside. Glue/tape closed. Create a handle on the top of the windsock by twisting two pipecleaners together and taping them to the inside of the cardstock like a rainbow.

Foil Wrapped Pineapple Chicken

This quick lunch or dinner is great for parties and bar-b-ques  or anything else where time is not on your side. Plus kids will love the individual pouches.  Easy to make fun for kids!

It's also another way to utilize the Hoisin sauce from the Chinese Chicken recipe.

What You Need:
Chicken Breast cut into chunks
Pineapple chunks
Minced garlic 1 tsp
Soy Sauce 2 tbsp
Hoisin Sauce 4 tbsp
Onion Powder
Ground Ginger
Black Pepper
Chives 1/2 tsp
Corn Starch 1 tsp
Honey
aluminum foil

What To Do: In a bowl mix Soy Sauce, Hoisin Sauce, minced garlic, cornstarch and chives. Sprinkle Onion powder, ginger, pepper, and a few squirts of honey into the mix. Mix well. Add chicken and pineapple chunks. Mix well and let marinate in the refrigerator at least 20 minutes -(the longer the better) Cut aluminum foil into squares so that when a pouch is formed it will sit in your palm.

Spoon chicken mixture into the center of the foil square and join the edges to make a pouch. Make sure to get some sauce in there, this will help keep chicken moist.

Place the pouches in a pan and cook for 40 mins in a 350 degree over.  Or Place them on a hot grill for 30 minutes.  Try not to over cook or the chicken will dry out.


Let cool and serve.

Tuesday, August 3, 2010

Felt Roads

Here is a simple way to help give your little ones Matchbox' and Hot Wheels a place to drive - that's not the edge of furniture, your leg, or expensive plastic track sets.

These customizable felt roads are easy to make and inexpensive. They can be arranged and re-arranged over and over in any combination your child can imagine.


What You Need: Black Felt, Yellow/White felt, scissor, craft glue, cardboard

What To Do: Cut the black felt into strips wide enough to drive a toy car on. Cut the yellow felt into thin strips and then cut those into strips about an inch long. Glue the small yellow strips onto the black felt roads and Viola! You're done. Use the cardboard as backing to make them extra durable. 

Tips: Because you're making them you can cut out whatever kind of roads you want: soft curves, corners, Y-shaped merges, 4 laned highway,  S-shaped zigzags. 

Store your roads in an hard pencil case or an old wipe container. 

Use them with train tracks, lincoln logs, plastic trees etc.

Thursday, July 29, 2010

Getting Kids Going

Exercise is an important part of growing strong healthy kids. But exercising doesn't have to be the stringent regime and doesn't have to turn you into a Drill Sargent.
Kids who engage in regular physical activity are stronger, more confident, and have a better outlook on life.

Here is a simple guide to helping you little ones get moving and stay healthy.

This is a suggested Activity Chart from Kids Health


Age
Minimum Daily Activity
Comments
Infant
No specific requirements
Physical activity should encourage motor development
Toddler
1½ hours
30 minutes planned physical activity AND 60 minutes unstructured physical activity (free play)
Preschooler
2 hours
60 minutes planned physical activity AND 60 minutes unstructured physical activity (free play)
School Age
1 hour or more
 Break up into bouts of 15 minutes or more

TEENS

Infants and young children should not be inactive for prolonged periods of time — no more than 1 hour unless they're sleeping. And school-age children should not be inactive for periods longer than 2 hours.


Planned play doesn't have to be gymnastics or little league, though those do qualify. It can be as simple as taking a walk, going for a bike ride, dancing, or playing catch. Free Play is just that where you don't guide a child's imagination, letting them climb, spin, run, play tag, whatever there little hearts (& legs) desire.

 Here are a few websites for more information and ideas for helping get your little one in a grove!

Kids Health
Let's Move Iniative
BAM! (Body and Mind) kids health by the CDC
Kids.Gov

Saturday, July 17, 2010

Kiddie Clean Up

Kids are messy. But with a little paitence and  ingenuity you can clear the clutter and organize the chaos (and even get the little ones  to pitch in!)
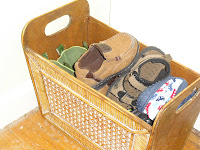
  • Utilize a storage caddy. (The one pictured was $1 at Target) Storage caddies work as both an organizing tool and a nifty clean up device. With small children, Moms can use a storage caddie to keep diapers, wipes, and binkies on hand as you move from room to room or out in the backyard. This way you don't have to keep running back to the changing table. Older kids and toddlers can use them to help clean up their toys, books, shoes, etc. They can load them up and carry them to their room/toy box. They can also help limit the mess by regulating how much a child can take with them. You can keep a child from leaving every toy they own strewn about the house by telling them they can only take out toys that can fit into the caddy and they have to  put back whatever they take out before getting more. This way clean up is always just one caddy load.
  • Stylish and Creative Storage Solutions. Just because you have kids doesn't mean that your personal style has to go out the window. Yes, your furniture should be child friendly - to prevent the heartbreak and tears that come when little chocolate hand prints show up- but you don't have to live in a world of primary colors and cartoon characters.  Use storage ottomans to hide toys and magazine holders to keep little shoes in order without sacrificing decor.  This not only helps your home have a bit of an adult feel, it also helps organize your kids, by giving everything a place and teaching them where to find and put their things.

Tuesday, July 13, 2010

Homemade Marionettes

These homemade marionettes are fun to make and provide hours of fun once completed. Make a bunch and put on your own retelling of your favorite fairy tales- Or make up your own! This is the perfect rainy day activity as it takes some time to put together and then provides hours of fun when done!

What You Need: Plastic cups of various sizes (one large & 5 medium per puppet), Yarn, cardboard, felt & decorations, glue, scissors,

What to Do: 

Parents may want to do these first steps before hand, so that children just have to decorate and assemble.  
  • Cut a lower case "t" out of cardboard for the puppet control and poke a hole in each of the four ends.
  • Put a slit or small hole in the bottom of each plastic cup. 
  • Put a slit or small hole in the back of the large cup (Body) and two of the smaller cups (hands) near the lip. Leave the  head and feet cups with just holes in the bottoms.
  • Put two slits on the side of the big cup near the bottom of the cup. These will be where the arms attach.
Once all the cutting is done, you & your child can assemble and decorate your marionette.
  1. Tie a knot on the end of the yarn and slip it through one of the arm holes. Cut a length of string as desired for arms. Slip the end of the yarn through the bottom of one of the hand cups (a cup with a hole in the bottom and side). Repeat on the other side. 
  2. Slip the yarn through the hole in the bottom of the large cup, the body. Pull a large length (excess can be trimmed later) through - think of this string as the spine of the puppet, connecting the head to the legs. Cut and tie knot in the end closest to the bottom of the cup (top of the puppet) Slip the knot through the bottom a small cup (head) so that the bottoms are facing each other. (Make sure to leave a bit of yarn for the neck and a bit to attach to the control.
  3. Cut a length of yarn for the legs, tie it at the midway point to the "spine"  so that you have to equal length legs hanging from inside the body. Slip one end of the yarn through a foot cup and tie a knot to secure. Then repeat with the other leg and foot. At this point your puppet should be complete (without the controls) and look like the picture below (it's sideways  now but this will be corrected shortly).
Decorate the Puppet with felt, pom poms, feathers and attach with the glue. Use permanent marker to draw a face.

For the controls:
  • Slip lengths of yarn through each of the holes in the cardboard cut out. 
  • Attach the top of the "t" to the yarn inside the head. 
  • Attach the sides of the "t" to the hands (again by slipping into the holes in the sides of the hand cups.
  • Attach the bottom of the "t" to the body by slipping the yarn into the hole in the back of the body near the lip. 

Once it's dry, Practice using the controls  to manipulate your puppet.

Monday, July 12, 2010

Plastic Spoon Puppets

This is a cheap and easy craft that you can do again & again  and can lead to hours of role playing fun!

What You Need: 
Plastic Spoons, Felt, Permanent Markers, Scissor, Glue, Pipe Cleaners

What To Do:
Draw faces on to the back side of the spoons with permanent markers. Carefully cut clothing, hair, hats, etc from felt. (Note: Fold clothing in half and use scissor to make a slit to slide spoon handle in) Glue hair on spoon. Wrap a pipe cleaner around the handle to make arms.

inspired by a post by Inspired Crafter

Sunday, July 11, 2010

Stick Raft

A great craft that you can do with items from the backyard!  Have the kids gather the supplies, construct rafts and find a puddle and race!

What You Need:
Sticks, twine/thread, leaf/paper

What To Do: Gather enough twigs and sticks to make a raft base, one longer twig for a mast, and four to help steady and brace the raft.  Break or snip the branches for the base with garden shears to make them almost even - doesn't have to be perfect.  Lay the twigs side by side, holding them firmly, lace the thread around the edge of  the sticks, weaving over and under until they are secure. Repeat on the other edge. Take the four twigs you gathered for bracing the raft and split into two groups of two. Tie the two twigs of each group together. Attach one group onto the base at the back on the other to the front going across (opposite) the twigs of the raft. The raft should now be firm and steady with relatively little wiggle. Turn over and work the longer mast twig in between the twigs of both the base and the front brace. Use a large leaf or a piece of paper to attach to the mast as a sail.

You now have a stick raft, that floats!

Friday, June 25, 2010

Fun with Pen & Paper


You don't need a lot of fancy toys to have big fun. Here are three activities for you and your little ones and all you need is a crayon and a sheet of paper (or more for more fun!) These are also great if you have to take your kids to work and they need something to do!


Copy Cat - Give each person a sheet of paper and a crayon. The first person draws a shape. Everyone else then has to copy that shape on their own sheet. The next person adds to the drawing, everyone then copies that on their sheet. Continue until everyone has had a turn or keep going until everyone decides that the picture is complete. Notice how similar yet different everyone's picture is.

There once was a Girl... - Again give each person a sheet of paper and access to crayons. Everyone then has to draw the following sentence: There once was a girl, who lived in a house, under a tree, next to a river.  (You can say the whole sentence at once or one piece at a time). Again compare and contrast how different their girls, houses, trees, and rivers are.  You can try these other sentences:
There once was a boy wearing a hat who lived on a farm with lots of animals.
There once was a frog, who lived on a rock next to a lake with lots of birds.
There once was a puppy who was digging a hole next to some flowers in the backyard.
Or Make up your own!

Three Piece Suit - Give each person a piece of paper and a crayon. Fold the paper into three sections. On your piece of paper draw a head and shoulders in the top section making sure the shoulder lines go just slightly over the fold. Decorate it how ever you'd like 2 eyes, 1 eye, 6 eyes! no mouth, curly hair whatever you'd like. It could be a potato head, a lions head anything goes! When you're done fold your paper so that the next section shows but not the head. Switch with another person. Now everyone draws the torso of whatever character they'd like: it doesn't  have to be the same one you drew before, again anything goes. No arms, six arms, fur, a dress, a bow-tie. Again draw all the way to the hips making sure the lines go just slightly over the fold. Fold the page again and switch: now everyone draws legs and feet being as creative as they want.  When everyone is done unfold the pages and see what kind of Creations you've come up with!

Wednesday, June 23, 2010

15 Minute Shrimp Scampi

Fifteen Minutes and 8 simple ingredients and have a delicious dinner!

What You Need:
Shrimp (peeled and deveined)
Chopped Broccoli
Instant Rice
2 Tbsp chopped garlic
Tbsp parsley
5 Tbsp butter
1/2 cup of Stock (seafood, chicken, or vegetable)
oil

What To Do:
Saute shrimp in oil in a large skillet until pink. Remove shrimp from pan, reduce heat and add the garlic to pan.           While garlic is sauteing, cook instant rice according to directions.  Add stock to pan and allow to reduce by almost half. Melt the butter into the sauce and replace shrimp into pan. Rinse broccoli and add to pan while still damp. Sprinkle parsley and stir well.  Cover and heat through.

Serve over rice.

Variations: Use 1/4 cup white wine and 1/4 stock for a more "grown up" taste. Or toss with Angel hair pasta instead of rice.

Monday, June 21, 2010

Summer Fun!

Welcome Summer! Today is the first day of Summer and here are a few activities to welcome the sunshine and beat the heat!

Garden Hose Limbo: Create a straight stream by holding your thumb on the end of the garden hose, if you don't have a nozzle, and let kids limbo under it.

Sponge Race: Fill a kiddie pool (or other large bucket), set up small beach buckets  a few feet away. Using larger sponges have kids soak up water in the kiddie and race to fill up their beach bucket.

Water Balloon Race: Fill a beach bucket with water balloons and let kids race to see who can pop all their water balloons first. Add crazy rules like not being able to use your hands and watch kids stuff their shirts with balloons and roll on the floor!

Click here for more Summer Games

painting by: allisa rachelle

Rocket-ship Fruit Skewers


A summery fun way to get kids to eat (and play with) their fruit!

What You Need: Fruit any kind: Strawberries, Bananas, Watermelons, Cantaloupe, Honeydew, Peaches, Plums, Cherries, Pineapples.... really any kind; Skewers or Chopsticks if you have small children

What To Do: layout the fruit and let the children build a rocket ship, using a Banana or Strawberry tip as the nose of the rocket. 

Then Eat!

Friday, June 18, 2010

T-Shirt Pillow Keepsake


You've bought the cutest little baby shirt and your child has out grown it in a matter of weeks. You know she can't fit it but you can't bring yourself to throw it away. Make a keepsake pillow out of it. 

What You Need: 

an old T-shirt
a pillow or stuffing
a sewing machine
scissor or stitch remover

What To Do: Turn the shirt inside out, depending on the size of your shirt, either remove the sleeves completely or remove enough of it to make it even with the body of the shirt. Sew close the neck and arm holes. Turn the shirt right-side out again. Stuff with the pillow and sew the waist of the shirt closed.

No-Sew Version: Use fabric glue to seal the arm, neck and waist holes.

This also works for any shirt you may not want to throw/give away like those from senior year, family reunions, walk-a-thons etc.

Stuffed Peppers

A yummy dish that uses few ingredients and doesn't take too much time to create. And who doesn't love a dish where you can eat the bowl too!

What You Need:
Green Peppers
ground meat
white rice
mozzarella cheese
spaghetti sauce
garlic, thyme, basil, rosemary


What To Do: Cut tops off peppers and remove all seeds. Arrange peppers in a baking dish. and set aside. Cook white rice according to directions. In a bowl sprinkle ground meat with a tsp. each of garlic, thyme, basil, & rosemary and mix well. In a skillet cook meat through until brown. Once cooked put on paper towel to drain. Combine meat and rice in a large sauce pan and mix well add spaghetti sauce a little at a time until consistency meets your taste.  Fill peppers with the meat/rice filling and top with cheese.  Place in oven and bake until cheese melts.

Sunday, June 13, 2010

Father's Day Pillow Craft

Make Dad this simple throw pillow. It's a great way to say Happy Father's Day and perfect for little hands to make.

What You Need:
two pieces of felt , Scissors, Fabric Glue, Cotton stuffing and any other ornaments and decorations you'd like - fabric glue, felt letters & Shapes, buttons etc.

What To Do:
Take a piece of felt and let your kids decorate it by drawing with fabric paints, attaching felt letters and personalizing for dad. Craft stores sell pre-cut felt letters and shapes, so you don't have to try and cut out a set of golf clubs to stick on your pillow.

Then using fabric glue, close up three sides of the pillow by gluing the edges of the front felt to the back piece. Once dry stuff with the cotton and seal the last edge closing the pillow.


For very small kids, you can dip their hands in fabric paint and press onto the felt to make a handprint pillow keepsake.

Another fathers day idea is the Change Dish that was posted for Mother's Day!

Saturday, June 12, 2010

Shoebox Fishing Game

This is the companion game to the box top coin flip game. When made together you can store the pieces inside the box and have two games in one travel case.


What You Need:
Shoebox
Construction paper
Blue & Green Pipe cleaners, pom-poms, feathers
glue
scissors
small magnet
paper clips
tape
yarn
chopstick


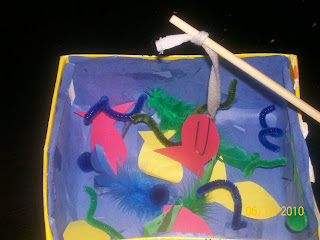
What to Do: Line the shoebox with blue construction paper. Glue or tape pipe cleaners, pom-poms, and feathers to act as ocean features.

Cut fish shapes out of a different color construction paper. Attach a paperclip to each fish lining it in up with the fish's mouth.

Make the fishing rod by tying a piece of yarn to the end of a chopstick. tape a small magnet to the end of the yarn.

How to play: Place the fish into the shoebox. Use the rod to try and catch the fish. two players can take turns seeing who can get all their color fish out of the box first.


Friday, June 11, 2010

Now on Facebook & Twitter!

The Mommy Mayhem Survival Guide is now on Facebook & Twitter! A new way to follow, keep up with new posts and make suggestions about topics, crafts, activities and recipes you'd like to see! We're also searchable on Google and Bing!

Twitter: MmyMyhmSrvlGd

Homemade Miniature Golf


What You Need:
metal curtain rod - separated to make 2 clubs
newspaper
old socks
a high bounce ball/tennis ball/ or handball
a shoebox

What To Do:
Make the clubs by separating the curtain rod and covering the ends with newspaper. Pad it up good for safety and to give kids a large area to strike the ball with. Cover the newspaper with a pair of old socks - one on each end. This is also a good way to help distinguish clubs - your club has your socks on it.

Use the shoebox as the hole, but cutting an archway into one end, and you are ready to play.

Indoors you can use furniture, shoes, cups, broomsticks etc as obstacles. Outdoors grass and concrete can act as rough and fairway, trees, hula hoops, buckets, etc can be obstacles. Make your course as easy or as hard as you want. Just place the shoebox down, arrange obstacles and putt!

Chunky Chinese Chicken


This is a recipe that my Dad has been making for years and years. I loved it as a kid and now my kid loves it! It's really easy and only needs a few ingredients.


What You Need:
4 Chicken breast or boneless thighs- cut into large chunks
eggs - beaten
flour
Hoisin sauce
three tsp (or packets) of soy sauce
powdered sugar
oil

What To Do:
Bread the chicken by dipping in the egg and then dredging in the flour. In a large saute pan heat the oil and then cook the chicken until golden brown and cooked through. Remove chicken from pan and let drain. when the oil has cooled a bit you want to discard it and wipe the pan quickly with a paper towel. Over a low heat, add the soy sauce to the pan. Then add one heaping tablespoon of Hoisin Sauce and stir. Once combined, add a tablespoon of powdered sugar and mix well. Add the chicken back into the pan and stir until well coated. It won't look like enough sauce but keep mixing.

Serve with white rice and vegetables - broccoli, carrots or snow-pea pods work best.

Note: Hoisin sauce can be found near the Soy Sauce in most Supermarkets. And you can easily adjust the amount of each ingredient to suit your families taste!

Thursday, June 10, 2010

Virtual Vacation: Destination Australia - Games & Activities

Down, Down, Down!

What you Need: a tennis or hand ball - that's it!

What To Do:
Bounce the ball between players, when a player misses the ball the other player says "Down on one Knee" - the player who missed must then continue to play but know from a kneeling position. If that player misses again then they go down on two knees, then one elbow, two elbows and finally the chin when they can no longer throw and catch the ball. The winning player is the one last one left when all other players are out - if playing with more than two players.

What Time is it Mr. Wolf?

This game is very similar to Mother May I? with a twist. One player is the wolf the others stand at a starting line. Players then ask "What Time is it Mr. Wolf?" the wolf will respond with "It's -O'clock" then players then take as many steps as hours the wolf says ie 10 o'clock is 10 steps and 7 o'clock is 7 steps. When the Wolf chooses he can respond with "Dinner Time!" at which the players must reach the start line before getting caught. The caught player becomes The wolf. Or if a player reaches the wolf before "dinner time" they can become the Wolf.

Virtual Vacation: Destination Australia -Crafts

Didgeridoo

A Didgeridoo is an Aboriginal instrument usually made the the hollow branches of a tree. Each maker has their own unique symbols, carvings and designs, making this the perfect craft to allow kids to express their own individual creativity.

What You Need:
1 wrapping paper tube, or a few paper towel or toilet paper tubes, tape, scissors, glue, plain white paper or kraft paper, crayons/markers

What To Do:
If using more than one tube then tape them together end to end to create one long tube. Cut the white paper or kraft paper so that it will wrap around the tube without any overlapping. Allow kids to decorate the paper in their own designs. Once done, glue the paper around the tube.

When it's dry children will have a one of a kind instrument. Blow into one end with clicks, moans, hums, and make your own Didgerdoo music.


Boomerang
No trip to Australia would be complete without a boomerang. Make your own in two easy steps

What You Need:
Cardboard
paint/markers/crayons
x-acto knife or box cutter

What To Do:
!!ADULTS!!! cut out a boomerang shape (a wide V) from the cardboard.

Let children decorate - for a true Australian feel dip paint with a chopstick or q-tip to get line, and dots.


Wednesday, June 9, 2010

Virtual Vacation: Destination Australia - Recipes

  • Breakfast - Toads in the Hole

  • What You Need:
  • 2 tablespoons olive oil
  • Thick beef or pork sausages
  • 3/4 cup Plain Flour
  • 1/2 teaspoon salt
  • 2 eggs
  • 1 1/4 cups milk
  • 1 tablespoon rosemary

What to Do:
  • Preheat oven to 400 degrees. Cook sausages by roasting or sauteing until cook through and golden brown. Sift flour and salt into a bowl and make a well in the middle. In a separate bowl whisk the eggs, milk and rosemary together. Add to flour mixture and mix until batter is smooth. Place the sausages in roasting pan and carefully pour batter over them. Bake for 30 to 35 minutes or until puffed up and golden.

For a more kid-friendly version use two tablespoons of mashed plums instead of or in combination with the rosemary.


Lunch- Zuchinni Fritata

What You Need:

  • 6 eggs, lightly beaten
  • 1 green onion- chopped
  • bacon
  • 1 small zucchini - sliced thinly
  • 2 tablespoons self-raising flour
  • 2 tablespoons milk
  • Salt and black pepper
  • 1/3 cup grated cheese
  • 8 cherry or grape tomatoes, halved

What To Do:

Preheat oven to 350°. Spray a baking pan with non-stick spray. Place the eggs in a large bowl and add the green onion, bacon strips, zucchini slices, flour, milk, salt, pepper and half the cheese. Stir well.Pour into the baking pan. Arrange tomato halves on top and sprinkle with the rest of the cheese. Cook for 20-25 minutes or until set and golden brown on top. Enjoy hot or cold.


Dinner - Lamb Chops with Mash Potatoes & peas

What You Need:
1- rack of lamb
thyme
rosemary
garlic
olive oil

potatoes
peas
butter
milk

What To Do:
Cut the rack into lamb chops. Mix thyme, rosemary, and garlic in a few tablespoons of oil, rub over lamb and let marinate for at least fifteen minutes. Grill the chops or sauté them in a pan with a tablespoon of oil.

cut the potatoes in to chunks. boil potatoes and peas in a pot of water until the potatoes are soft. Drain, then add a splash of milk and a tablespoon of butter mix well. Add salt and pepper to taste.

Drink - Cranberry Crush

What You Need:
Cranberry Juice
Lemonade
your favorite berries (strawberry, blueberry, raspberry,etc.)
Ice

What To Do:
Blend ingredients together and serve.

Virtual Vacation: Destination Australia - Folktale

The Origin of Narran Lake

Old Baiamee said to his two wives, Birranulu and Kunnanbeili, " I have stuck a white feather between the legs of a bee and i am going to follow it so that i may get some honey. While i go for the honey, go you two out and get frogs and yams, then meet me at Coorigil Springs where we will camp, for the water is sweet and clear there."
The wives took their net bags and yam sticks and went out as they were told. When they collected all the yams and frogs they could carry, they headed to Coorigil Springs. They were tired when they arrived and seeing the sweet, cool water they longed to swim. They built a small shade and there they left their net bags and yam sticks with the food they had found. When the camp was ready for the coming of Old Baiamee, Biranulu and Kunnanbeili removed their belts and placed them near the shade. Then went swimming in the Springs. And while they were enjoying the cool water they where swallowed whole by two Kurrias - crocodiles. After they ate the girls the dove under the water and into a narrow pass to the Narran River, they took all the water from the springs with them.
Old Baiamee still making his way to the bee's hive, followed the bee to a patch of Salt flowers where it hid. "Something terrible has happened to my wives, for the bee would not hide otherwise. I must make my way to Coorigil Springs." When he arrived he saw the shade his two wives had made along with the net bags and yam sticks, but he did not see the wives. He found their belts and called after them. When there was no answer he went to the edge of the spring and saw the tails of the Kurrias going through the narrow pass. "This is the work of the Kurrias, They have taken my wives through the narrow pass to the Narran River. Well do i know the the passage and will go there at once."
Arming himself with spears and woggaras, Old Baiamee made his pursuit. Soon he reached the deep hole that joined the Coorigil springs and the Narran River. There he saw the the hole was dry and decided to head to the river to get in front of the crocodiles. Swiftly Old Baiamee sped through short cut after short cut until at last he reached the end of the Narran. He hid behind a dheal tree and waited for the Kurrias to come into sight. As the kurrias came near they separated. Quickly Old Baiamee hurled spears one after another wounding both Kurrias. They wiggled and writhed in pain and lashed their tails about making great big hollows in the ground. The water that which was stopped up by the kurrias soon filled the hollows. Fearing they would get away he pulled them from the water by the spears and killed them with his woggaras.
Baiamee cut open the kurrias and removed his wives bodies, they were covered in slime and very still. He thought they were dead. Soon a swarm of ants came and removed the slime from their bodies. The sting of the ants woke the girls and they rose to their feet. Baiamee came to them and explained how he had saved them from the Kurrias. And warned them about swimming in holes where Kurrias hunt. The bade them look at the water now that killed the area. "Soon will the black swans find their way here, the pelicans and the ducks. where the dry land and stones once were, in the future there will be wanter and waterfowl. From now on, when the Narran River flows it will run into this hole and make a big lake in this place."
And what Baiamee said has come to pass as the Narran Lake proves, with its large sheet of water spreading for miles the home of thousands of wildfowl.

Virtual Vacation: Australia

Australia is the land down under. The only country that is also a continent has a rich, vibrant, history full of twists turns and intrigue. Take this virtual Vacation and learn all about Aboriginal cultural, it's original settlement by British criminals and the long influx of immigrants that make Australia one of the most diverse countries in the world. And multiculturalism isn't the only diversity in Australia, the land has everything from deserts to Rain Forests.

Come taste the fair, play the games and experience: AUSTRALIA!

Language & Culture
Music & Dance

Deciding on Discipline


One of the toughest jobs a parent has is as disciplinarian. It's easy to get swept up in emotion and add stressed, over worked, and over tired to the mix and you'll find yourself yelling and telling your kids to go to their rooms and not to come out 'til they're 30! Here are a few tips on how to deal with disciplining your kids.
This is not a referendum on spanking and having a discussion on how to discipline your child doesn't have to be a to spank or not to spank talk. What techniques you use, are up to you as parents. But the key to a good discipline is consistency.
  • First develop a punishment scale. Not every crime deserves the same punishment. So, don't give small missteps the same consequence as major ones. If you do, there is nothing to keep your child from acting out in a big way; and you'll forever need to think of bigger and badder punishments for them.
  • Avoid open-ended punishment. Make sure the consequence has an specific end time. Whether that's sitting in time out for 5 minutes or no TV for a week, having a set ending for punishments makes disciplining easier for you and the child. This helps keep infractions separate and you can be sure you are properly doling out punishment. It also keeps your child from feeling stuck in an endless cycle, where they need to be perfect. For example if you've taken away the TV for a week and your child misbehaves on the next to the last day, instead of adding another week of no TV, trying taking away phone or internet privileges. This way they feel the immediate sting of losing another privilege, in two days they get back the TV but still have to wait another 4 days for the phone.
  • Breathe. Take some time before doling out the sentence. In the heat of the moment we may not realize what is actually going on. Take a moment, you may remember that you took the frame off the shelf while cleaning and were distracted by a phone call when you told the kids to go play in the den -- Or that your son only hit his sister after being tormented about his new braces for an hour. Do the kids still need to be disciplined yes, but not to the same degree as if these acts were deliberate or unprovoked.
  • Reverse the Strategy. Reward the good behavior with lots of praise and attention. You don't have to bribe them or to shower them with expensive gifts for things like doing homework and cleaning their room. But noticing your kids when they do things right will help keep them from doing things wrong. Try things like letting a avid reader get an extra story at bedtime every day they have their homework done on time and their bed made, or let an outdoorsy kid get ten extra minutes of play just because she asked nicely and didn't whine.
  • Stick to it. Don't let your kids out of a punishment just because you're sick of them being in the house, or because you want to go out. This only teaches children that if they make a nuisance of themselves they'll never really have to finish out a sentence. Instead try a "work-release" program, where they can earn time off their punishment by exhibiting not just good behavior, but unselfish behavior. For example, for every hour they help clean the yard, sort recycling, etc., they get back an hour of playtime.
  • Don't make family time a punishment. As kids get older time with their friends becomes more and more important, but don't try not to force children to spend time with the family because they acted out in school. The last thing you want is for your kids to hate spending time with you as a family.
  • Be a Role Model! Modeling good behavior for your kids is prime. Treat them with respect and they will being to show respect to others, their friends and to you! Kids are smart and they pick up on things very quickly. Soon you will see a positive shift with less and less time and effort spent on correcting bad behavior.

Tuesday, June 8, 2010

An Afternoon of Summer Fun


With five items that you can find in the dollar store and a hot summer afternoon you can have a world of fun! What you need: A hula hoop, a bouncy ball, a laundry basket, a pack of water balloons, and two beach buckets. Aside from the obvious games, here are a few other games you can play to entertain your little ones!


1) Snowcone Relay: Place the bouncy ball on top of one bucket, set up obstacles -like going around trees, down the kiddie slide, over the laundry basket, hoping through the hula hoop- and have kids take turns going through obstacles and pass the ball from bucket to bucket without using hands.

2)Laundry Basket Ball: toss, bounce, or roll the ball into the laundry basket using the buckets, and the hula hoop as obstacles to make it more difficult. Example, place the basket on its side and place the hula hoop a few feet away with the buckets upside down to form two towers half way between the hoop and the basket. Have your child stand in the hoop and roll the ball between the buckets and into the basket.

3) Target Practice: Place the hula hoop on the ground with a bucket in the center making a target. Standing a few feet away, toss filled water balloons at the target.

4) Dodge Balloons: Place the buckets a few feet away from each other with the laundry basket in the middle and put a bunch of filled water balloons in the laundry basket. Stand next to a bucket, on "Go" race to the basket and grab a balloon, race back to your bucket and toss the balloons into the other bucket, try blocking the other persons balloons from getting into your bucket.

More Water Games to Welcome Summer.

(Photo by Tom Anthony)

Monday, May 31, 2010

Slow Cooker Chicken & Dumplings

The ultimate comfort food! Chicken & Dumplings that is so simple and so easy but so rich and flavorful it'll taste like you slaved away all day, when all you did was drop some ingredients in the Slow Cooker!


What You Need: Chicken Thighs & Legs, 1 tube of biscuits, frozen carrots, 3 cups chicken stock, thyme, sage, paprika

What to Do: Place chicken in the slow cooker and sprinkle liberally with sage, paprika and thyme, add carrots and chicken stock. Cook on high, stirring occasionally until the chicken is fall off the bone tender. Remove chicken from slow cooker and shred. Replace shredded chicken without bones into the slow cooker. Pull apart biscuits and drop pieces into the slow cooker. Stir gently and let cook for 30 minutes. Stir again and continue to cook if the dumplings aren't cooked through.

Sunday, May 30, 2010

Coconut Shrimp

This recipe combines two of my toddlers favorite things, shrimp and food he can eat with his hands! This coconut shrimp is a great kid-friendly dinner and a jaw-dropping appetizer when guest come over. It's quick, easy, and delicious!

What You Need: Shrimp -thawed, shelled & de-veined, flour, flaked coconut, eggs, breadcrumbs, oil for frying.


What To Do: Set up an assembly line with three small bowls. In the first bowl put some flour, in the second two lightly beaten eggs, and in the last combine the coconut and some unseasoned bread crumbs. Going down the assembly line, dredge shrimp in flour, then dip in the eggs and cover with the coconut mixture. Once all the shrimp are done, heat the oil in a frying pan. Add shrimp to pan and cook until golden brown on all sides. It only takes a minute so be mindful.

Serve with an Orange Marmalade as a dipping sauce and enjoy!

Saturday, May 29, 2010

Box Top Coin Flip Game

This is one craft that will be fun long after the glue dries!

What You Need: a shoebox top, felt, marker, glue, scissor, a coin or button

What to Do: Cut the felt to line the inside of the box top and glue it in place. Then cut shapes with other remnants of felt to create scoring sections. Use the marker to write values on the felt shapes. Glue them randomly on the felt inside the box top to create the game board. Let dry.

How to Play: take turns flipping the coin or button into the box top. Earn points by getting the coin to land on one of the scoring sections. After 5 rounds the player with the most points wins.


Pair with the Shoe Box Fishing Game for two games in one box!

Monday, May 24, 2010

5 Games to Play with an Alphabet Mat

An alphabet mat is a wonderful teaching and play tool. the vibrant colors and washable foam make it great for even the youngest of kids. There are several obvious ways to play, but here are 5 unconventional games to play:

1) Alpha-Hop Scotch: It's just as you would imagine. Make a hopscotch grid with a few letters from the mat. As you hop down have your child say the letter they land on. For kids learning to read, have them make each letter sounds. And older kids can say a word that begins with that letter. (Note: use consonant blends as the double rows: BL, WH, ST, FR, PL)

2) Alpha-Twister: Again it's very much like the what you would think... You can play this one is a variety of ways, again by letter, letter sound, beginning letter, even color, or use all 4. Just write out the letters, colors, and words on strips of paper and place them in a hat. (Or if you have Letter Flash Cards use them). In another pile write out Left Hand, Right hand, Left Foot, Right Foot. Pick one card from each pile. Examples: Left Hand A; Right Foot 'Ssss'; Left Foot Blue: Right hand on the first letter in the word Pear. Use what ever works for you and your kids.

3) Rhyming Word Families: This is more of using the mat as a teaching tool. Put together the root of a word family, ie: -AT. Then have your child find the letters that will make rhyming words. Help them to sound out each of the words. M-AT; B-AT, C-AT, P-AT, F-AT, H-AT, FL-AT, R-AT, S-AT....

4) Alpha-Boggle: Lay out the mat in a 4x4 square A,E,I,O, U, R,S,T,L,N,P,B,D,C,H,M using the letters and have your child search for words by connecting letters.

5) Letter Train: Have your child put a random selection of letters in a row, then help them identify each letter and the sound it makes. For older kids, have them make up a story using the letters, example, if the letters are O, C, D, E, W, F,A, S: You might say, One Cold Day, Edward Went For A Swim; or Octopus Carl Dove Every Week For An entire Summer...


Saturday, May 22, 2010

Stuffed Bread


I learned this recipe a few summers ago from my friend Dorothy. It's is so easy but seems so complicated. Its a one dish dinner with endless variations!

What You Need: cooked Chicken strips (they sell precooked strips or you can grill a chicken breast and slice it), your favorite shredded cheeses, chopped broccoli and carrots, a tube of crescent rolls or croissants

What to Do: Preheat oven to 350. Roll out the crescent roll dough on to a cookie sheet and press the dough to get rid of the perforations. In a bowl mix the chicken, cheese, broccoli and carrots. Place the mixture on top of the dough and then pull the ends of the dough to meet. press firmly so that it will bake closed.

Bake until the dough is golden brown.

Slice and serve.


Variations: You can stuff your bread with whatever you'd like, the trick is to make sure the meat is cooked before placing it in the dough. Try:
-spaghetti sauce, mozzarella cheese and meatballs.
-strips of steak, mushrooms and onions.
-shrimp and squash seasoned with sage.

This is also a great way to convert leftovers into a new dish. Use leftover roast chicken instead of grilled chicken breast, or chop up leftover meatloaf and mix with softened potatoes and onions and gravy.

Tuesday, May 18, 2010

Virtual Vacation: Destination Spain: Music & Language

The Spanish culture is full of rhythm and flavor. The perfect way to introduce your child to Spain is through it's music and language. Here you can find snippets of both, a link to a wonderful Children's Music site and a brief lesson in Spanish with some easy words to incorporate throughout the day while on your Virtual Vacation.

MUSIC: Here is a collection of children's songs and nursery rhymes from Spain, Mama Lisa's World, complete with lyrics in spanish and english and music.


LANGUAGE: The official language of Spain is the Castillian form of Spanish. Here are some basic Spanish words to teach your kids while on your Virtual Vacation:

Hello: Hola (O-La)

Goodbye: Adios (Ah-di-os)

How are you?: Como Esta? (Ko-Mo Es-sta)

Bathroom: bano (Bon-yo)

Please: por favor (Pour Fahv-or)

Thank You: gracias (Gra-see-ahs)

Food: alimento (ah-lee-ment-to)

Mom: Mama

Dad:Papa

Son: hijo (E-ho)

Daughter: hija (E-ha)

Family: Familia (Fa-mil-li-ah)

Virtual Vacations: Destination Spain - Games

Tres Cosas (The three things)

How to Play: Stand with your child in the middle of the room or yard and choose three objects that you both can see. While you close your eyes and count to ten (in Spanish if you can), your child has to try and touch all three objects and get back to your side. When you get to ten, your child should hide and you open your eyes. Without moving look to see if you can find them, if not you close your eyes and begin counting again. Your child can then continue touch the objects and getting back to you. Continue this pattern of counting and hiding, until either the child is caught when you open your eyes or they get back to you before you finish counting. Then choose three more objects and switch.

Virtual Vacations: Destination Spain - Folktale/Story

The Tinker and the Ghost

A long time ago there was a haunted castle in the hills where no one dare go. The castle had been empty for years and years and tales of the ghost that lived there grew the longer the castle stood empty. One day, in the market a pot maker named Esteban, over heard several women talking about the haunted castle. The owner of the castle had offered a rewards of 1,000 gold pieces to anyone who could get rid of the ghost that haunted the castle. Many men tried but no one could stay in the castle long enough to get rid of the Ghost. Anyone who tried to spend the night in the castle was frightened away before long.
Esteban decided that he would try to free the castle of its ghost, so he loaded up his donkey with lots of firewood, a sleeping bag, eggs, bacon, and a pan and started up the hill to the castle. When Esteban reached the castle the first thing he did was start a fire in the fireplace. Then he laid up his sleeping bag. Soon Esteban was hungry so he put the pan in the fire and began to make some eggs for dinner.
An eerie voice called, "Oh My, Oh My!"
"Who is there?" Esteban replied through he was a little scared he decided to stay. The voice sounded like it was in trouble. Maybe the Ghost needed help.
"Oh My, Oh My" the voice called again. "Help me I'm falling" and with a Plop! the ghost leg fell down the chimney and in front of the fire place. Esteban took it and put it to the side. As Esteban began to eat his supper, he heard the voice call again. "Oh My, Oh My! I'm Falling" and Plop down fell another leg. Soon a torso fell then one arm and the other and finally a head. Esteban helped the ghost put himself back together.
"thank you!" said the Ghost. " I have been trapped for many many years and no one has ever stayed long enough to help me."
"What help do you need?" Esteban asked the Ghost, who was now not scary at all.
"I buried, in the courtyard, three bags of coins. One bag of bronze coins, one bag of silver coins and one bag of gold coins. Will you help me dig them up?"
"Yes." Esteban agreed and went out to the courtyard with the Ghost. They found the place where the coins were buried and began digging.
When all three bags were unearthed, the Ghost said, "Please give this bag of bronze coins to the Church."
"I will." Said Esteban.
"And please give this bag of silver coins to the poor."
"I will" said Esteban.
"The last bag of gold coins, you can keep for yourself. Thank you for helping me." The Ghost said.
"Thank you!" Esteban said gratefully and watched as the Ghost disappeared into thin air.
In the morning, Esteban did as he promised. He gave the bag of bronze coins to the Church and the bag of silver coins to the poor. He found the owner of the castle, "The Ghost will not haunt here anymore." Esteban said and collected his reward. Esteban lived out the rest of his days a very happy man and was never afraid to help someone in need.

Virtual Vacations: Destination Spain - Crafts


Here are two fun Spain-themed crafts for you and your child a pair of Castanets and a flamenco fan!

Castanets
What You Need: 4 Large buttons or bottle caps, felt, glue, rubber bands, scissor

What to Do: Cut the felt into two "Glasses" shapes (circles connected by a narrow strip). Lace the felt through a rubber band to create a handle. Glue the bottle caps/buttons into the felt circles. Once dry, slip the rubber bands over your fingers and hold the castanets between your thumb and index & pointer fingers. Clack away!

Flamenco Fan
What You Need: construction paper, 2 paint stirrers/large popsicle sticks/pieces of cardboard, crayons/markers, glue, rubber bands, ribbon/yarn

What to Do: Decorate the paint sticks and both sides of the construction paper with crayons/glitter. Glue a paint stick to each and of the ends of the construction paper. Fold the construct paper to make an accordion. Use a rubber band to hold the ends of the paint sticks together.

Virtual Vacations: Destination Spain - Recipes

Traditionally in Spain lunch is the biggest meal of the day. Many people get off of work and school to go home to have lunch with their families (and to have a Siesta!). But for the purposes of your Virtual Vacation you can stick to a traditional meal schedule and just substitute in these foods. Here are a Breakfast, Lunch, Dinner, Dessert/Snack, and a drink from Spain!

Breakfast: Traditional Spanish Omelette.
What You Need: (per person) 1 small potato, 2 eggs, olive oil

What to Do: Cut the potato into slices and saute them in a shallow pan until golden brown. Remove form the pan and set aside to drain. Beat the eggs well and then add the potatoes. Add a few more drops of oil into the pan and then slowly pour in the potato and egg mixture while gently shaking the pan to prevent sticking. Once the eggs are cooked, slowly slide the omelet onto a plate and replace in pan to cook on the other side. Once both sides are done, remove from pan cut and eat.

For a variation, you can add just about anything else to this dish: onions, spinach, ham, mushrooms, cheese... it's up to you.
Lunch: Shrimp Fritters (Tortillitas de Camarones)
What You Need:
1/2 pound of shrimp,
1 1/2 cups of flour,
1 tbsp parsley
2 finely chopped scallions
1 tsp Paprika
olive oil of frying.

What to Do:
Cook shrimp in a few cups of water, once water is boiling, remove shrimp and let cool. Reserve 1 cup of the water and discard the rest.

Mix the rest of the ingredients then slowly add in the cup of water until you have batter that is somewhere between thick pancake batter and pudding. Refrigerate for an hour.

Finely chop the shrimp and add tot he batter mixing well. Heat the oil in a frying pan. When oil is hot drop in (a spoonful at a time) the batter, flattening each round with the back of the spoon. Turn once and cook til golden brown. Remove and drain on paper towel.

Dinner: Chicken Paella
The Arroz Con Pollo recipe is a great one to use for dinner, as Paella is the ultimate Spanish dish and it may be a little difficult to get you little one to eat the squid, mussels and clams in it. Chicken Paella is the same as Arroz con Pollo, so this may be the night to try it out.

Drink: Non-Alcoholic Sangria
In a large pitcher mix 4 cups Cranberry-Grape Juice with 1 cup of Orange Juice and 1/4 cup of Lemon Juice. Drop in a few slices of orange and some chopped up apple. Chill and serve. You can add a splash of lemon-lime soda for some extra pizazz!